
I'm sure many of you have already seen it because when I went to Lori Holt's blog,
"Bee In My Bonnet"...I found out that there was already a wonderful Quilty Fun
sew along that's been going on for quite a few weeks. But, you can still visit and
see all that has been going on. I would, if I were you! It's quite quilt-inspirational!
Then, I decided to stroll (um...er...shop?) on over to the Fat Quarter shop to see if
there were any of those cute fabrics of Lori's. LOW and BEhold! yep there shore
were...this is one of my FAVs...aren't the retro clocks cute? And they have them in
more colorways too...oh...and, with more cute coordinates!

Then...I went to Jolly Jabber YouTube of Lori Holt...
It's when they visited her here in Utah. Oh! more darling things, ideas and instructions.
Next?...well, I'm off to the actual YouTube place looking for more Lori Holt
instructional and ideaVideos. Wow...lots more Lori Holt videos there! One of them
got me shifting tracks (yes, again!) from YouTube...to...
...searching for a sewing machine template called the Angler2. Click here
to watch Lori's great video on how to get an exact quarter inch. Over the years
(40 some odd), I've not had to terribly-hard of a time, sewing the quilter's quarter.
But, this looked like a fun and easy way to be even more accurate.
Digging through drawers in my sewing room for about 30 minutes
like a dog looking for last

After reviewing the video a couple of times, I figured a way to use glue-stick,
(I didn't have any of those special tacky thingies mentioned in the video) the
template tightly/accurately to my machine's slide on table. Picking out a few
scraps from my bin, I lined the sides together and began to sew the quarter inch
seam using the Angler2 guide. It lined up perfectly with the template, my
presser foot, and needle. ~~except =(
~~except... and, this is no fault of the template or Lori's instructions -
But, my sewing machine has a throat plate with a 9mm opening for decorative
stitches. If I line up my fabric so that the perfect quarter inch is created with
this template, only one feed dog is working with the presser foot to feed the
fabric thru. I find that I need to move the needle position to the right so that I
can move the edge of my fabric over to the side of the presser foot. This makes
it so that both feed dogs are evenly helping the presser foot. My machine just
likes it better this way.
For me, this template doesn't work as well for the 1/4"...on my machine. It's
very possible that it would work really good, on yours. It was SUPER nice to
have that line to follow before it went to the needle. It would definitely be worth
your while to check out her video about the Angler2. And, while you are there.
you might find quite a few other fun ones of Lori's!
Now...I'm bummed. =(
Oh, wait. A sad thought was leading to creative thought.
I could create my own line on the machine's table so that I could have my
own guide line when the needle position was moved to my machine's sweet
(1/4") spot. This thinking leads to more household searching...I'm again a
dog on a hunt for a "bone". I need a tape that is reposition-able and quite
flexible. I didn't want painter's tape because it was the "wrong" color...
(blue...nope-nope-nope...my machine is white with a red face/black lettering).
Duck tape won't work...to harsh of a sticky-ness.
Yep, more searching...upstairs, downstairs, leads to a search in the garage.
That leads to searching in the Laundry room cupboard. I found it...in the
cupboard! The black electrical tape. Being very flexible and black (this was
a good color), it was also reposition able without leaving any residue.
Here is what I came up with:

I used a silver inked Sharpie to write on the electrical tape. I made it so I can still
slide my table on and off, as well as, take off the throat plate. I layered the electrical
tape in front of the needle 4 times. That way I had a ridge to run the fabric along.
Maybe you've already seen something like this? I think I have...sometime,
somewhere. I just didn't remember the details on what they used to create the line.
But, this works great for me! We'll see if my fickle sewing heart will still be
doing the "happy dance" about this idea...a few weeks down the road. =P
It's your turn -
It would be awesome to hear your ideas/methods for getting that "perfect" 1/4"
quilter's seam allowance. You, most likely, have even MOE BUDDER ideas
than the one I shared!
WELL, that certainly was a trip down the "CAD" lane...meandering through blogs,
and YouTube videos, etc. You might be asking just what IS "CAD"???
---it's Crafter's Attention Deficit. =P I don't think any of YOU would ever get
that sort of disease, right?
This really is such a fun book! I went right to Lori's etsy site and
purchased one! I can visualize many ideas for all these cute quilt blocks
that she's designed.
It's such a great book...what about a...
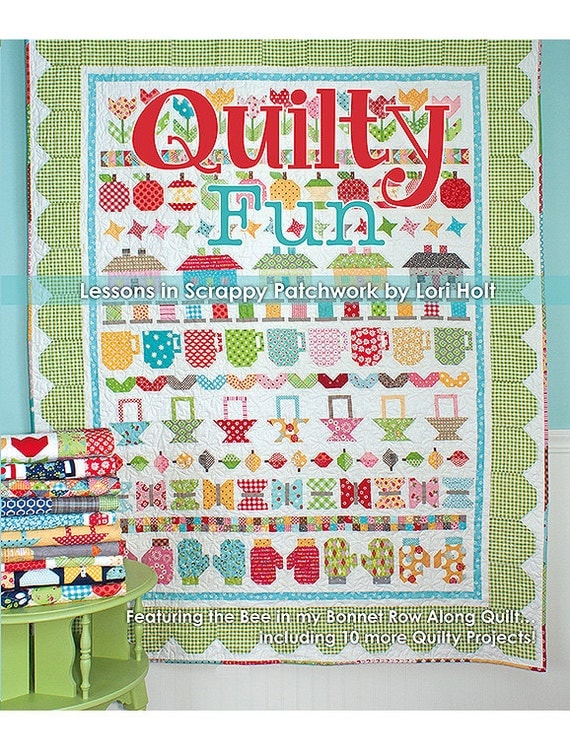
...GIVEAWAY? an autographed copy??
Yes? okay...here is what you would need to do to enter:
1) please click on this link to visit where it all started and
see all of the PDFs for the different week's blocks
2) and/or visit Lori's blog for week 13 click HERE
I know it's a bit into the activities. But, there are still
quite a few fun things in store. You can read older
posts on the the blog for previous week's quilt along
info
3) come back here and leave a comment about some of
the fun things you saw!
**Only leave one comment, thanks =)
Entries will close -
February 21st...Friday mid-night, mountain time.
18 comments:
I love that book. I went looking at the PDF tips and then went to see the fall leaves. The sampler quilt is amazing...and then I nearly got lost on Lori Holt's Pinterest boards. I have followed all her boards but I have also put a link in my empty google plus circle called 'Favourite Links' so I can easily go back later.
With my 1/4 inch seam I just sew a fraction smaller than my foot. The many pieced sampler I did worked out perfectly so I am happy with my 1/4 inch seam.
valspierssews at gmail dot com
I did the row quilt with Lori last year. And now they are doing the wallhanging with her new book. I think the apples were my favorite. I know where the sweet spot is on my New Home and the new Juki I put down some blue painter's tape.
I love this beautiful book! I followed along with the row along... but I came in late and fell behind! Boo! I have about 3/4 of the rows done and now... I have to buy yge boom! LOL I do love her fabric! I have it on my list of must haves! Beautiful!
I really love that book. I would have to say my favorite block is the coffee mugs :-D
I love your electrical tape idea. I too have trouble with the 1/4" seam. I kinda followed the row along but did not participate. She has some cute blocks. I loved the mittens.
Thanks for the electrical tape tip!
I looked at Lori's blog - I wish I'd followed her row a long!
I love the apples!
Oh my gosh, you crack me up! I visualized you going through the motions the entire time I was reading this...and, yes, the retro clock fabric is very cute! ;)
I love this book. I made Lori's row quilt. My favorite blocks are the coco mugs and the houses. But I love all of them. I would LOVE an autographed copy of her book!!!
Because I don't have the book, I haven't done the quilt-along, but I have certainly enjoyed seeing each week's project. Her design's are so cheerful, and could be carried over to so many other projects. With a change in color scheme and a little winnowing, this would make a darling Christmas quilt.
Thanks for the chance to win the book. Maybe I can catch up if I win!
Lori's book is on my wish list. I did follow along with her blog updates. When I get the book this quilt is a definite to make. Fan4may at aol dot com
Those blocks are so cute! I really love the little leaves. I've used the Easy Angler 2, but only for HSTs - it sure makes that job easier!! Great idea to use electrical tape. Smart!!
The blocks are really nice - but the layout is really what catches my eye I really like the way things are chunked together in different orientations. Thanks for putting my name in the hat for the drawing.
The tape was a good solution to the problem. I loved the interview they did as they were taking pictures of Lori's house, didn't you? Everything looked so wonderful. I kept wondering, does it really look like this when she's living in it? LOL The mittens are definitely my favorite block - I'm in a mitten mood, I guess! This is a great giveaway, thanks! dezertsuz at gmail
i love her blog and her quilts and would love to make one, they are so cute, thanks for the chance
I read every post Lori does and her Fat Quarter Shop Utbe tutorials, they're very easy to follow. Her sewing room is so neat, I'd love to have that kind of space. I could spend hours on her Pintrest page. I'd love to have a copy of Lori's book, it's not your basic pattern book, the layouts are so different. Great giveaway! Thanks ;-> Toni Anne
Oh! I have been following Lori's blog for some time~ she has such adorable ideas! I love her sewing room! I would've joined her sew along, but didn't have the book. Thanks for the chance!
I've been following Lori's blog and just love seeing what everyone has been getting up to. It's amazing how using different fabrics gives a whole different look. Thanks for the lovely giveaway Annie.
Post a Comment